If you’re ready to take control of your business operations, this guide walks you through how to install Odoo 17 on Ubuntu with ease. Whether you’re setting up a fresh system or upgrading an existing one, we’ve got you covered.
We’ll guide you step-by-step through the installation of Odoo, ensuring nothing gets missed. From preparing your environment to fine-tuning settings, everything is laid out clearly so you can feel confident along the way.
Our goal? Help you successfully run Odoo 17 on Ubuntu 20.04 without the guesswork. You’ll learn how to install and configure Odoo for your specific needs, setting a strong foundation for your business to grow.
Let’s dive in and get your Odoo setup running smoothly from the very first step.
Table of Contents
Prerequisites: Preparing Your Ubuntu 20.04 Server
System Requirements
Before jumping into the Odoo 17 installation, you’ll need to make sure your server can handle it. Ideally, you should have at least 2GB of RAM and enough disk space to store all the data, backups, and other files.
Initial Server Setup: Updates and Security
Log in to your server via SSH:
ssh your-user@your-server-ipOnce you’re in, execute the following command to bring everything up to date:
sudo apt update && sudo apt upgrade -yTo boost security, you may need to install additional security tools depending on your setup.
Next, let’s enable a firewall for basic protection. Use:
sudo apt-get install ufwThis uses apt-get install to bring in UFW, a simple firewall manager. Once it’s installed, you’re all set to move forward with a more secure, stable server.
Phase 1: Installing Core Dependencies
Step 1: Installing Essential System Packages
Step 1: Installing Essential System Packages
Before Odoo 17 can run smoothly, you need to set up its foundation with the right system libraries. These support performance, image processing, and database communication. Go step-by-step, using apt-get install to avoid missing anything.
Install these packages one group at a time:
libxml2-dev libxslt1-dev zlib1g-dev libsasl2-dev libldap2-dev

libxslt1-dev zlib1g-dev libsasl2-dev libldap2-dev build-essential

zlib1g-dev libsasl2-dev libldap2-dev build-essential libssl-dev

libsasl2-dev libldap2-dev build-essential libssl-dev libffi-dev

libldap2-dev build-essential libssl-dev libffi-dev libmysqlclient-dev

build-essential libssl-dev libffi-dev libmysqlclient-dev libjpeg-dev

libssl-dev libffi-dev libmysqlclient-dev libjpeg-dev libpq-dev

libffi-dev libmysqlclient-dev libjpeg-dev libpq-dev libjpeg8-dev

libmysqlclient-dev libjpeg-dev libpq-dev libjpeg8-dev liblcms2-dev

libjpeg-dev libpq-dev libjpeg8-dev liblcms2-dev libblas-dev

libpq-dev libjpeg8-dev liblcms2-dev libblas-dev libatlas-base-dev
You only need to run each combination once, and this avoids unnecessary clutter. Use sudo apt-get install for proper permissions and apt-get install -y to skip confirmation prompts.
This step covers every core dependency Odoo 17 needs to function without hiccups.
Step 2: Ensuring Python 3.10+ Installation
Odoo 17 needs Python 3.10 or newer. If you haven’t already, install Python:
sudo apt install python3 python3-dev python3-pipThen, create a Python virtual environment to keep things clean and contained. A python virtual environment makes managing dependencies easier and avoids conflicts.
Step 3: Installing the PostgreSQL Database Server
In step 3, install PostgreSQL—Odoo’s default database server:
sudo apt install postgresql postgresql-clientThis ensures postgresql is ready and waiting for your Odoo setup.
Step 4: Configuring PostgreSQL for Odoo
Create a new PostgreSQL database user for Odoo, like odoo17, and assign a secure password. This sets up the proper connection between Odoo and your database.
Step 5: Installing Wkhtmltopdf for PDF Reports
For clean PDF generation in Odoo, you’ll need wkhtmltopdf. Grab it using:
sudo wget https://github.com/wkhtmltopdf/... sudo dpkg -i wkhtmltopdf.deb sudo apt install -fThis installs the utility smoothly with apt install.
Step 6: Installing Node.js and NPM
Some front-end features in Odoo rely on Node.js and LESS. Run:
sudo apt install nodejs npm sudo npm install -g less less-plugin-clean-css sudo apt-get install -y node-less sudo ln -s /usr/bin/nodejs /usr/bin/nodeThat install -y npm sudo ln combo helps you avoid common errors with Node pathing.
Phase 2 – Setting Up the Odoo 17 Application
Step 7 – Creating a Dedicated Odoo System User
For better security and cleaner management, it’s smart to create an Odoo-specific user. This way, Odoo runs in its own space and doesn’t interfere with the rest of your system. Run the following command to add the odoo user:
sudo useradd -m -d /opt/odoo17 -U -r -s /bin/bash odoo17Step 8 – Downloading Odoo 17 Source Code
Now that the user is ready, let’s download the actual Odoo files. First, switch to the odoo17 user and then clone the latest Odoo 17 code from GitHub:
sudo su - odoo17 git clone https://www.github.com/odoo/odoo --depth 1 --branch 17.0 /opt/odoo17/odoo exitThis will give you a clean base to start building your odoo instance.
Step 9 – Setting Up a Python Virtual Environment
To keep your project organized, you’ll want to use a virtual environment with Python 3.10. It prevents conflicts with system-wide packages.
sudo su - odoo17 -c "python3.10 -m venv /opt/odoo17/venv" source /opt/odoo17/venv/bin/activateStep 10 – Installing Required Python Packages
Let’s now install the packages Odoo needs. Begin by installing wheel using pip3 install wheel, followed by all dependencies listed in Odoo’s requirements file using pip3 install -r:
sudo su - odoo17 -c "/opt/odoo17/venv/bin/pip install wheel" sudo su - odoo17 -c "/opt/odoo17/venv/bin/pip install -r /opt/odoo17/odoo/requirements.txt"Step 11 – Creating Custom Addons Directory
To make future upgrades easier and keep things clean, it’s best to store custom modules in a separate directory. This directory will later be added to your addons_path:
sudo mkdir /opt/odoo17/odoo-custom-addons sudo chown odoo17:odoo17 /opt/odoo17/odoo-custom-addonsStep 12 – Configuring Odoo (odoo.conf)
Now, let’s create and configure Odoo’s main config file. Start by creating the directory:
sudo mkdir /etc/odoo17 sudo nano /etc/odoo17/odoo.conf
Here’s a sample configuration to paste in (update values with your own secure settings):
[options] admin_passwd = YOUR_MASTER_PASSWORD db_host = False db_port = False db_user = odoo17 db_password = YOUR_DB_PASSWORD addons_path = /opt/odoo17/odoo/addons,/opt/odoo17/odoo-custom-addons logfile = /var/log/odoo17/odoo.log xmlrpc_port = 8069The admin_passwd sets the master password for your Odoo instance. Fields like db_host, db_port, db_user, and db_password handle PostgreSQL database access. Always use a strong password for your database user.
Set proper permissions on the config file:
sudo chown odoo17:odoo17 /etc/odoo17/odoo.conf sudo chmod 640 /etc/odoo17/odoo.confStep 13 – Creating the Log Directory
Odoo needs a place to write logs, so let’s create that too. This ensures all system logs are stored in one safe location:
sudo mkdir /var/log/odoo17 sudo chown odoo17:odoo17 /var/log/odoo17Phase 3 – Running Odoo 17 as a Systemd Service
Step 14 – Creating the Systemd Service File
To manage Odoo efficiently, we’ll create a odoo17.service unit file that lets systemd control the app—starting it at boot and restarting it automatically if needed. Run:
sudo nano /etc/systemd/system/odoo17.serviceHere’s a sample configuration:
[Unit] Description=Odoo 17 After=network.target [Service] Type=simple User=odoo17 ExecStart=/opt/odoo17/venv/bin/python3 /opt/odoo17/odoo/odoo-bin Restart=always Environment=PATH=/opt/odoo17/venv/bin [Install] WantedBy=default.targetThis file defines how odoo17.service should behave. Once created, it will be odoo17 loaded into systemd as a manageable service.
Step 15 – Enabling and Starting the Odoo Service
Next, reload systemd and enable the service so it starts on boot:
sudo systemctl daemon-reload sudo systemctl start odoo17.service sudo systemctl enable odoo17.serviceStep 16 – Verifying the Installation
Check the service status to confirm everything’s working:
sudo systemctl status odoo17.serviceYou should see an output like:
● odoo17.service - Odoo 17 Loaded: loaded (/etc/systemd/system/odoo17.service; enabled; vendor preset: enabled) Active: active (running)If not, check logs for errors:
sudo systemctl status odoo17.servicePhase 4 – Accessing and Finalizing Odoo Setup
Step 17 – Accessing the Odoo Web Interface
With the service up and running, it’s time to access Odoo. Open your browser and visit:
http://<your_server_ip_or_domain>:8069If the page doesn’t load, your firewall might be blocking the port. To fix that, run:
sudo ufw allow 8069/tcpThis opens the default web port Odoo uses.
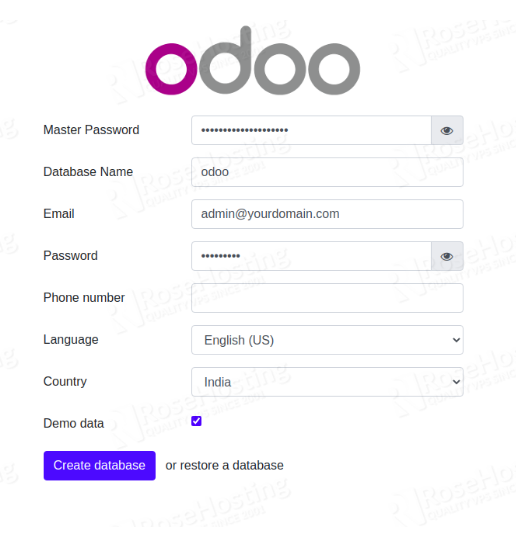
Step 18 – Initial Odoo Database Setup
Once the web interface loads, follow these steps:
- Set your Master Password (from the odoo.conf file).
- Create your first database.
- Set an admin email and password.
- Choose your preferred language and country.
- Optionally, load demo data for testing purposes.
That’s it—your Odoo environment is ready to use.
Troubleshooting Common Installation Issues
Checking Logs for Errors
When something doesn’t work, the logs are your first stop. Use the Odoo log to catch specific errors:
bash
CopyEdit
sudo tail -f /var/log/odoo17/odoo.log
You can also check the system log for broader service-related issues:
bash
CopyEdit
sudo journalctl -u odoo17
Service Fails to Start
If Odoo won’t launch, look for:
- Incorrect file paths in the config or service file
- Permission or ownership problems
- Wrong database credentials
- Missing Python packages or system dependencies
Fixing these usually resolves most startup issues.
PDF Reports Not Working
If PDF exports fail, it’s likely due to wkhtmltopdf. Either it’s missing or the installed version isn’t compatible. Make sure you’re using the recommended build for Odoo 17.
Dependency Conflicts
Unexpected errors during installation or runtime often trace back to conflicting Python packages. This is exactly why using a dedicated virtual environment matters—it keeps Odoo’s dependencies clean and isolated from the system Python.
Conclusion
You’ve just taken a solid step toward building a powerful business management platform by learning how to install and configure Odoo. Whether you’re running Odoo 17 on Ubuntu 20.04 or considering an upgrade to Odoo 17 on Ubuntu 22.04, the foundation remains the same—clarity, control, and customization.
From here, focus on setting up your preferred modules, testing your environment, and making the interface your own. And don’t forget—regular backups and maintenance aren’t just good practice, they’re essential for keeping everything smooth and secure.
Ready to unlock the full potential of Odoo? Let’s keep building.
Tip: Regularly back up your database and keep your server updated for security and stability.
Frequently Asked Questions (FAQ)
What version of Python is required for Odoo 17?
Odoo 17 needs Python 3.10 or higher to run smoothly.
How can I check if Odoo 17 is running properly?
Use:
sudo systemctl status odoo17.service Then visit the web interface at http://your_server_ip:8069.
Where are the Odoo 17 logs located?
By default, logs are stored here:
/var/log/odoo17/odoo.log Why use a dedicated system user for Odoo?
For better security and system isolation, keeping Odoo’s processes and files separate is a smart move.
What is Wkhtmltopdf used for?
It converts HTML views into PDF reports, like invoices and quotes.
Why is PostgreSQL required?
Odoo uses PostgreSQL as its database engine, storing all business data there.
How do I manage the Odoo service (start, stop, restart)?
Just use:
sudo systemctl start|stop|restart odoo17How do I enable Odoo 17 to start automatically on boot?
Run:
sudo systemctl enable odoo17
Can I install Odoo 17 alongside older versions?
Yes, but it requires careful setup with different ports, users, and configs. Not covered in this basic guide.